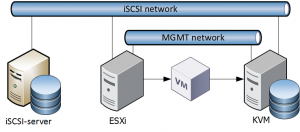
The ESXi-host is using an iSCSI-target as storage provider. The KVM-host has local storage but is also connected to the iSCSI-network.
This is how I went about migrating a couple of virtual machines running different operating systems between the two hypervisors.
Mount the iSCSI-target on the KVM-host
The KVM-host need to be set up as an iSCSI-initiator (client).
yum install iscsi-initiator-utilsIn order to be able to mount VMFS a third-provider repo must be installed.
yum install https://forensics.cert.org/cert-forensics-tools-release-el7.rpm
yum install vmfs-tools
Find out which iSCSI-target to mount by first running dynamic discovery, logging in and then mount the partition within the blockdevice ie the /dev/sdX1. The IP-address is the iSCSI-targets IP. I found it easiest to then reference the disk by path in order to find out which lun is which.
iscsiadm -m discovery -t sendtargets -p 192.168.100.13
iscsiadm -m node --login
vmfs-fuse /dev/disk/by-path/ip-192.168.100.13:3260-iscsi-iqn.2004-06.net.strahlert.home:esxil1-lun-0-part1 /mnt
If all is well you should see something like this.
[root@kvm01 ~]# df -h /mnt
Filesystem      Size  Used Avail Use% Mounted on
/dev/fuse       700G  685G   16G  98% /mnt
Convert the VM
Now that the iSCSI-target is mounted we can proceed with converting the VM.
qemu-img convert -O qcow2 /mnt/esxi-v39/esxi-v39.vmdk /kvm/vm/esxi-v39.qcow2Then define a new VM in KVM and chose to import an existing disk – the resulting qcow2 disk from the conversion. Before you power up this VM, enter its configuration and change the disk bus to IDE. Add a second disk with VirtIO as disk bus. Then power the VM up.
When the VM has started, uninstall the VMware tools and then install the VirtIO-drivers.
- For Windows this is done by connecting the https://fedorapeople.org/groups/virt/virtio-win/direct-downloads/stable-virtio/virtio-win.iso in the guest VM and install.
- Easiest is opening the device manager, right-click each unknown device and chose to update the its driver. Specify local storage and point to the mounted ISO.
- Also, remove any old network drivers. In the view menu, select show hidden devices and delete those.
- FreeBSD has had native support since 9.0. Simply add
virtio_load="YES"andvirtio_pci_load="YES"in /boot/loader.conf. No temporary disk is required - The VirtIO disk is called
/dev/vtbdXso/etc/fstabwill have to be changed accordingly - The VirtIO NIC is called
vtnetXso/etc/rc.confwill also have to be changed
The guest VM can now handle VirtIO presented disks and peripherals. The temporary second disk can then be removed and the primary disk set to use VirtIO.
In KVM, configuration can be changed while the guest VM is running. But in order for it to become active, the VM must be shut down (not rebooted). After powering it up again, the VM now lives in KVM and runs with minimal latency thanks to the VirtIO drivers!
Linux guests using LVM disk
Linux guests that uses LVM disks will have to have their initramfs rebuilt. This is how to do that.
- Boot the CentOS installation CD and chose rescue mode
- Chose option to mount your Linux installation readwrite
- Run the following
chroot /mnt/sysimagedracut -f /boot/initramfs-$(uname -r).img $(uname -r)- Then reboot

Recent Comments